Showing posts with label reuse. Show all posts

Tuesday, November 20, 2012

Turkey Stock


Last week  we had a Thanksgiving at work. We had three turkeys and everyone brought in sides and desserts. On of my big regrets from the Christmas party last year, I almost took the ham bones home but then I was too embarrassed or something and I did not. Well, I did not make that mistake this year. When I left work today I left with tree turkey carcasses. While I got several weird looks I did not care. I was going to make turkey stock and freeze it for the winter. When I got home and was getting ready to break apart the turkeys I realized that there was a decent amount of meat left on there. So I started to shred the turkey in a much more personal hands on way then they were willing to do at work. I ended up with three pounds of turkey. Mind you these birds were only twelve pounds each so three pound of meat was pretty cool. I did not take any pictures of my disassembled turkey carcasses but I made  two batches of broth in my slow cooker, since it was already out from the pot luck. Here is the breakdown:
  • 1 1/2 turkey carcasses
  • 4 large carrots chopped in to large chunks
  • 4 stalks of celery chopped in to large chunks
  • 1 yellow onion chopped in to quarters
  • 4 cloves of garlic
  • 6 bay leaves
  • 2 Tablespoons of Ms. Dash 
  • 1 Tablespoon of thyme
  • 10 peppercorns
  • 12 cups of water
Put everything in the removal able iron insert and put it in on the stove on high heat for twenty minutes until it starts to boil then put it in the slow cooker base on high for 4 hours and then reduce it to low heat for 8.


After you refrigerate it overnight take it out and scrape out all the fat that has hardened on the top. 

Tuesday, December 13, 2011

Leftover Ham Salad


There is a Rachael Ray recipe for a Ham Salad that I love to use when we have leftover ham. This was our plan when we took ham home from Thanksgiving. I knew that I was going to make some substitutions but when I got home and looked in my cabinets I ended up having to make many more which changed the whole recipe. Here is the one that I came up with:


Ingredients
  • 2 tablespoons Dijon mustard
  • 1 1/2 tablespoons balsamic vinegar
  • 2 cloves garlic, grated
  • 1/4 cup EVOO - Extra Virgin Olive Oil
  • 4 shakes of dried tarragon
  • Salt and ground black pepper to taste
  • 1 bunch asparagus, woody ends discarded, thinly sliced on an angle
  • 1 pound of leftover ham, cut into very thin strips
  • 4 slices of Munster cheese
  • 2 babybel original wheels
  • 1 slice mozzarella cheese
  • A loaf of crusty bread

Mix together Dijon, Balsamic vinegar, tarragon, olive oil, garlic salt and pepper. 


Add the rest of ingredients.


Serve as a salad or on bread as a sandwich. 


Wednesday, November 23, 2011

Escort Card Holder & Entry Table ~ Wedding Wednesday

I wanted the table on the way in to have more than just the guest table. Nat got us a finger print tree that he had custom made for us, it was an aspen grove instead. Mikey and I found this:


I asked Mary my mother in law if she could pick up some navy milk paint. It happened to be on clearance so she got it for $1.


I sanded it down so the paint would stick.


Then I painted.


Here it was all assembled at the reception.


Signing the guest book, and leafing your fingerprint. 


Afterwords I gave this to my friend Shantel she uses the escort card holder as a potty training chart. She keeps prizes in the cubbies. 

Tuesday, November 8, 2011

Travertine Herringbone Coffee Table

On March 19 Mikey and I bought a round  herringbone travertine coffee table. It is beautiful. The legs were not stained a shade I did not like, 70's golden brown.


If that was not bad enough, and it totally was, it was damaged and chipped. I knew it had to be totally redone.


Mikey convinced me to do the scariest thing that I have ever done with furniture, we took the top off. I was afraid that it would ruin the structural integrity of the piece. But it did not. :)


Remember the post that I did on how stripper reacts differently to different substances well this was no exception this blistered there really is not a different word for it. 


Then I stripped it again,


and again, 


and again, 


then I sanded, 


and sanded,


then Mikey stained it three times as I cannot be trusted with stain. 


This stuff was actually very amazing I wish we had this when we were doing the entertainment center. 


It is General Finishes in black. I cannot give you a real picture as my can is not so pretty anymore. 


Finished result. 


I finished this back in July but I was consumed with all things wedding I never shared it with you and I wanted to. I hope you enjoyed this and learn that if something has great bones you can make a great transformation. So when grandma offers you some family heirlooms...

Linking to these parties:

Friday, October 14, 2011

A to Z (bookends)


I found this at Dream Book Design and I felt the urge to fill it out. 

A. age :: twenty eight

B. bed size :: queen

C. chore you hate :: dusting

D. dogs :: none now but one day Gizmo and Bamf

E. essential start to your day :: snooze, shower, tea

F. favorite color :: Tiffany blue

G. gold or silver :: silver

H. height :: five feet eleven and 1/2

I. instruments you play :: used to play the flute and there was one night a 
tambourine

J. job title :: wife and friend, Inventory and Operations Supervisor

K. kids :: none yet

L. live :: Littleton, CO

M. maiden name :: Tietz (I have heard all the jokes)

N. nicknames :: Smello, t, Martha Child

O. overnight hospital stays :: Only when I was little

P. pet peeve :: mouth noises, bad neighbors, mean people

Q. quote ::
  
“Be who you are and say what you feel, because those who mind don't matter, and those who matter don't mind.” ― Dr. Seuss

R. righty or lefty :: right

S. siblings :: Chris, Chris, Shannon, Angela & Bradley

T. time you wake up :: Usually around 4, unless its Friday its 3.

U. university attended :: University of Colorado


V. vegetables you dislike: beets, love the rest

W. what makes you run late :: procrastination

X. x-rays you’ve had :: This year MRIs and cat scans

Y. yummy food :: steak, deserts, cheese

Z. zoo animal favorite :: Giraffes

Thursday, October 13, 2011

Thrifting Thursday

I have not been going thrifting as much as usual during the whole wedding process. I thought I would share a few things with you, first things I did not end up getting:


I would love to get some solid wood bookcases to replace our black ones. They are the first thing you see when you come in to our place. I thought I had found a set for $14.99 each but when I brought Mikey in he said they were just veneer. I wanted to strip them, sand them and stain them black but with just veneer it is not worth the risk. 


This end table had a similar story. I love its midcentry lines and how it would have complemented our entertainment center. I could tell that the legs were solid the top and casing was veneer which I was ok with on this piece. I had wanted to remove the handle and put a matching handle to our entertainment center. That was why this piece failed to launch. The way the handle was secured on would not come off without marring the whole front. Darn. 


This piece I did come home with for only $.78. This picture does not do it justice. It is completely made from wax. Seriously... The back says:

Miniature Wax Pictures
By Colleen and Scott Rice 
These beautiful miniatures are painted with melted colored wax on paper using a patented technique called CireCraft. Marie-Claire Wadden, a French painter, developed CireCraft fifteen years ago from inspiration she received in a dream.
Specially coated paper is pulled through pools of melted wax to achieve the background. Then a small iron is used to paint in the subject matter and accents. The iron acts much like a palette knife does working with oils, adding or removing wax and blending colors. Because the wax has a mind of its own, each painting is unique and cannot be duplicated.

There was then their names and phone number. Which I considered placing here so if people were interested in the wax painting they could contact them. Putting your name and phone number on the back of a painting is very different then putting your info on the net. So I googled them to see if they had a site. I found something unexpected. It kind of blows my mind, but the info is consistent.


Monday, March 21, 2011

70's Bar cart Redo

I went out on my first outing by my self today after being laid up for a week. Where did I go? The Salvation Army near my house where I recently found the Thomasville dresser that I am using for shoe storage and our new coffee table, you can see them here if you missed it. Today I did not buy anything. I am trying to live like the Amish until the wedding, plus I have so much stuff I should be working through that first. Plus Mikey says that the condo is really full now. There were two things that I considered.

1. Ceramic Bunny, It was not vintage like I though and I don't really decorate for Easter besides the wreath on my door, go big or go home, which happened to put this bunny back on the shelf.

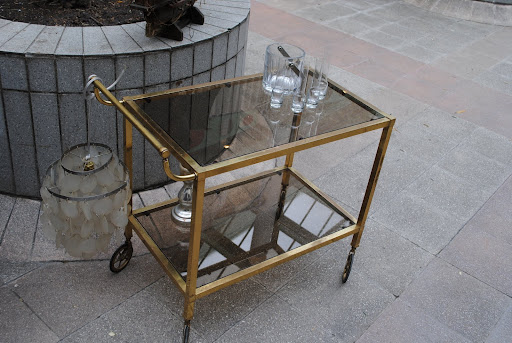
2. 70ish Brass Rolling Cart (this is not it but similar)


The one I saw today was brass like this one, however the wheels were more generic and the handle was smaller and low rise. I want a table to go on the right side of the sofa. There have been several ideas about this. Before I saw the cart the plan was to make one with my childhood kitchen table legs that my mom gave me before they moved to Texas. It would be a simple rectangle with the shorter side facing out and the long line following the sofa. it would have a single small drawer for our current five remotes and one day one harmony remote. The top would be travertine to match the coffee table maybe even in a herring bone pattern. I would then find a vintage metal basket fix wheels to the bottom of it and put in rolled up blankets. 

 I was in a bit of a stew today thinking about all the work that has gone into and still needs to go into the dinning room chairs. To add to that stress I have only been working on four of them and have already logged seven or so hours and had help from Miss. Technically one of those chairs is not even for the dinning room; it is styled the same though so we can pull it out in a pinch and not have it look funny.

I find that whenever I am tackling a huge project that is taking FOREVER and I do not really have anything to show for it. After the seven hours I had put in and the two more I spent out there today I only have one chair that is almost ready to be painted. I mean primed, painted, and then put a poly topcoat on. Then I start lusting for a quick project that will give me something to post about. Re enter the cart.

I saw this cart a while ago and filed it because I love it. 


So today I was thinking I could take out the glass inserts spray paint it hammered black, get some pallet wood or old fence posts cut them down fasten them together and put them where the glass would have been. Quick project, cute results. There would be some issues with this:
  • I would not get to use my childhood table legs. Not only are they sentimental and sitting at that table with my mom I learned so many things, a lot of which I utilize in this blog. Secondly in taking the legs it made that table less useful to someone else, they won't be making the same kind of memories and I do not want to waste them. 
  • Where would the remotes go?
  • No more cute vintage basket, which I am really looking forward to. 
So I left it there, and I am really not having any regrets. The new plan is everyday this week, weather permitting, I want to spend at-least an hour in the garage working on those chairs. Hopefully by Saturday they will all be completely prepared and ready to go. I do have to work this weekend but that is irrelevant. I also want to finish preparing a silverware box that I bought a long time ago and get that finished this week. I also need to work on a pillow project that has been in my dinning room since early January. That is the new plan. 

Thursday, March 17, 2011

Ding-dong the hutch is done

Remember this project?


Well it is finally, finally done. (See the process below)


First I stared to sand this. I even bought one of those handy sanders that claim to keep the sawdust in a bag. See how in the before picture this was inside. Because we had scared our wood floors TWICE brining it up I was not about to try and have it moved again. 

I started painting with those foam brushes as I had a million of them. I could not find my purdy brush it was on top of the dryer, why I put it there in the first place? And just to clairify we have a stacked washer and dryer, the dyer is taller than me, and not many things are. So I did not look there. I like to use what I have but after I broke 7 or 8 of those foam brushes and then did a coat with the purdy I realized how much time I had actually wasted. It probably took less time to to do the third coat of brown then the primer coat and the first two of brown. All of the paint I had in my collection the brown was Bitter Chocolate (790B-7) from Bear in eggshell that I have had for a while, I cannot even remember what I bought this for originally, I did use it on my last dinning room table that is now back with Annika, and I have used it on this hutch and the floating shelved that went inside. I felt pretty crafty for that as one of the glass shelves was broken. The floating shelves were from my room at my parent's house. Through the 2 moves after that the hardware was missing. So I put them on the back of the hutch so we could drill them in. Then I was able to use something that was not able to be used before . 


Our Purdy brush is not very pretty anymore, and we have only had it since last February. It has been though a lot.


Here was one of the steps along the way, this took many coats. I primed the whole thing and then there was three coats of brown and cream.


There were a few spots where the caning had popped up a little Gorilla Glue and they went right were they were suppost to.


Thank goodness by the time I had gotten to this part we had found the brush because making sure that I got in to every little square in the caning took a lot of work. 


It really looked great once it was done. 


The drawer had some issues and I wanted to store electronics in there so I wanted it to be soft but textured to make sure things would not just slide around. 


This was one of the place-mats that I had gotten when I had purchased the tropical bedroom set. You can see more of the motif here. I added the bits to the side so that it would be the same depth. 


Then I trimmed it out with indigo blue ribbon. 


The ribbon I had taken off some of our Christmas ornaments now that this blue is not part of our main color scheme. 


So this is the finished product. 


I put in plenty of our books which I covered in brown matte paper from the container store. I write the titles on them with brown sharpie so you can see them up close but not from afar. 


Then I filled it in with picture frames and other accessories. 


I am linking this to the following parties:


Piece of Work Wednesday at Primitive & Proper
Tuesday Treasures at My Uncommon Slice of Suburbia
Restored it Wednesday at Restore Interiors
Power of Paint Party at Domestically Speaking
Transformation Thursday at The Shabby Chic Cottage 
March 2011 at the DIY Club Inc
Free For All at Young and Crafty
Friday Flair Linky Party at Whipperberry
Sunday Showcase Party at Under The Table and Dreaming
Think Pink Sundays No.2 at Flamingo Toes

Saturday, February 26, 2011

Soft Scrub

I feel as though I reduce and recycle an awful lot but where I am very focused right now is REUSE. I was taking a shower and using some of the last of my Aveda Damage Remedy shampoo and I realized that the bottle was exceptionally well made and I should try and use it for something else. I am trying to only buy Comet as far as cleaning products go and I bought a value pack from Sam's Club so I will have some for a while. I was missing my Soft Scrub so I decided to make some.


So I gathered some materials that I had around the house
  • A lone sock, I think the dryer ate the other one. 
  • Iron on letters from an old project I made a shirt that said cutely neurotic I did not have all the letters I needed but I could make them.
  • My bottle
  • Scissors
  •  Comet
  • Mixing Bowl


I ironed on all the letters that I had cut up to work and combined Comet and water to make a paste. 


This was the finished product. It would be a lot cooler if i had a silhouette and could make a vinyl label but it will work in the meantime.