Tuesday, April 19, 2011

Apple Butter Spice Cake

I have been on a kick to clean out condiments from my regenerators before they expire. We received a lot of additional condiments and frozen foods when my parents moved to Texas last year. We have slowly been trying to reduce the amount we have. One great trick for that it marinades. Chicken has been a lot more interesting at our house, it has been marinated in ranch, spicy mustard, raspberry vinaigrette salad dressing as cornucopia of options none of which were bad. I also discovered a jar of homemade apple butter. A few weeks ago I made and apple butter cake from a recipe that I adapted from Eating Well.


INGREDIENTS

  • 1 tablespoon butter
  • 1 cup apple butter (there was probably 1/2 cup left in the jar so I just used it all)
  • 3/4 cup packed light brown sugar
  • 3 tablespoons canola oil
  • 1/2 cup raisins
  • 1/2 cup buttermilk
  • 1 large egg
  • 2 teaspoons vanilla extract
  • 2 cups plus 2 tablespoons all-purpose flour
  • 2 teaspoons baking soda
  • 2 teaspoons ground cinnamon
  • 2 teaspoons ground ginger
  • 1 teaspoon ground allspice
  • 1/4 teaspoon salt

PREPARATION

  1. Preheat oven to 350°F. Coat an 8-inch square cake pan with nonstick cooking spray.
  2. Melt butter in a small saucepan over medium heat; swirl the pan until the butter turns a nutty brown, about 1 minute. Pour into a large bowl. Add apple butter, brown sugar (breaking up any lumps) and oil and whisk until smooth. Add raisins, buttermilk, egg and vanilla; mix well. Add flour, baking soda, cinnamon, ginger, allspice and salt; whisk until just combined.
  3. Transfer the batter to the prepared baking dish and bake until a knife inserted in the center comes out clean, 35 to 40 minutes. Let cool for 10 minutes before serving.

NUTRITION

Per serving: 311 calories; 7 g fat ( 2 g sat , 3 g mono ); 27 mg cholesterol; 58 g carbohydrates; 4 g protein;2 g fiber; 373 mg sodium; 156 mg potassium.

If you want to keep the nutritional values that are stated stop there, if you are longing for something a little more sweet like I was add the crumble topping from last weeks banana crumb muffins

In a small bowl, mix together 1/3 cup packed brown sugar, 2 tablespoons flour and cinnamon. Cut in 1 tablespoon butter until mixture resembles coarse cornmeal. Sprinkle topping over muffins.

Tuesday, April 12, 2011

Banana Crumb Muffins

I love to make treats on Tuesday and Mikey found this recipe a few weeks back and we have made them several times, for us, my work, his work, and everywhere they have gone they have been a hit! The recipe is from all recipes. You can tell the popularity from the website as well while other banana muffins have three hundred or so reviews this one has over six thousand, and it still averages five stars!!!


Ingredients

  • 1 1/2 cups all-purpose flour
  • 1 teaspoon baking soda
  • 1 teaspoon baking powder
  • 1/2 teaspoon salt
  • 3 bananas, mashed (I used 4)
  • 3/4 cup white sugar
  • 1 egg, lightly beaten
  • 1/3 cup butter, melted
  • 1/3 cup packed brown sugar
  • 2 tablespoons all-purpose flour
  • 1/8 teaspoon ground cinnamon
  • 1 tablespoon butter

Directions

  1. Preheat oven to 375 degrees F (190 degrees C). Lightly grease 10 muffin cups, or line with muffin papers.
  2. In a large bowl, mix together 1 1/2 cups flour, baking soda, baking powder and salt. In another bowl, beat together bananas, sugar, egg and melted butter. Stir the banana mixture into the flour mixture just until moistened. Spoon batter into prepared muffin cups.
  3. In a small bowl, mix together brown sugar, 2 tablespoons flour and cinnamon. Cut in 1 tablespoon butter until mixture resembles coarse cornmeal. Sprinkle topping over muffins.
  4. Bake in preheated oven for 18 to 20 minutes, until a toothpick inserted into center of a muffin comes out clean.

Nutritional Information

Amount Per Serving  Calories: 263 | Total Fat: 8.1g | Cholesterol: 40mg

It is sure to be a hit anywhere, well as long as no one has a banana allergy. :)


Monday, April 11, 2011

Mr. Steamy

It was part of my New Years post and my New Years Resolution to consume less. So when I finally ran out of the stock pile of fabric softer that I had, we buy in bulk to reduce packaging. So last week I bought a Mr. Steamy. It is advertised that you can put dress shirts in and they will come out ready to wear.

Step 1 - Add water to Mister Steamy. Step 2 - Toss Mister Steamy in the dryer. Step 3 - As dryer heats up ball steams up!From cottons to polys to blends...Mister Steamy is the fastest way to get wrinkles out without getting the iron out. 
{Via Mr. Steamy site}

While I do not think that it replaces ironing. But I do think that it replaces dryer sheets. :) 

Saturday, April 9, 2011

Wood Stump Box Makeover

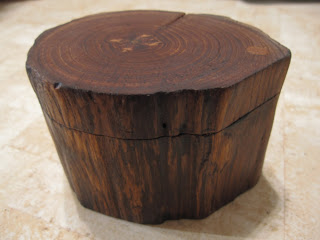
On Thursday only spent $1.36 thrifting. You can check out all the really cool things that I saw and passed up here. I saw a box like this somewhere pretty hip a while back, West Elm maybe? I do not recall excactly. What I can remember is that they wanted  $50 or $60 for it which is just highway robbery in my opinion. Making some thing like this does require a lot of skill or just having the right tool to carve out the inside, cut the top off perfectly and then make a dowel out of  the innerds that you cut out. If they wanted to be more neurotic they could have cut the dowel from the same part in the guts so the rings would line up. Back to where we started:


I am really curious what they had initially glued on to the top and then later ripped off. 


The dowel hinge was in great shape it opens and closes easily. The had drilled in from the bottom not all the way through. So if I had not had to sand down the top so much you would never had know it was there. 


This was after a good sanding. See the dowel in the middle?


It had seemed that they had used wax or something on the box. I did not have any wax at home and it was late at night. I decided that I wanted to oil it. So I googled instructions and started applying coats. It took five in all I just kept applying as it was allowing it to soak in. 


I wiped off the excess that did not soak in and buffed the whole thing with a paper towel.


All done!


 It was a great simple quick restore. Unlike my other project I have going on:


This is the office chair.


These are two of the seven dinning room chairs (see their former appearance here and here), I am hoping to have six of the eight total chairs completed this week. By the way Sherwin Williams is having a 40% off sale on paint and stain right now, check it out. 

I linked this to the following parties
Think Pink Sundays No. 5 @ Flamingo Toes
Sunday Showcase Party @ Under the Table and Dreaming

Thursday, April 7, 2011

Thursday Thrifting

Today I had a lot on my mind, I needed to do something relaxing, so I went to the thrift store that is near my place, the same one where I recently found the solution to my shoe storage and our coffee table. Today I only spent $1.36, however I did see a few things with potential like this side table


I thought it could be classed up by changing out the hardware and painting it cream.


This I would have purchased if it was not $10 I have a large metal bucket that I keep in the guest room to keep extra items in that guests may need. Currently it just sits on the ground, but I have been looking for something to raise it up a bit for a while now. If this had been $5 we would be having a different conversation here. It is made of solid wood, I have also come to observe that if there is an inspector stamp somewhere on the item it is usually of pretty good quality.


This one had one. I am not sure what the surface was made of, it was not solid wood. 


This little beauty was $5, but it was pretty rickety even though I fiddled around with it for a while. It even had a matching friend. The top is it marble you ask? No, it is contact paper, and while I like the lines of the item and I could have stripped off the contact paper and made a more desirable surface, I am not sure it would have been repairable to be solid again. 


Lamp redo's are very popular right now. These would have been ideal options if I needed some lamps. They are a matching set, although one was very obviously much nearer to a window. Paint would fix that right up.


They had this really lovely solid wood detailing at the bottom.


These trays would have been a great project. I think someone had gotten them with that in mind as one was very poorly painted black. They were $5 each, if they were less I would have gotten them and painted them out to have a great colored trim with chalkboard paint on the inside, or painted them black or white and cut out a very large photo for them to be frames. 


This was $45, and I think that it could be well worth that with a little work. If you got a dremel tool and cut off all of the detailing and refinished the wood you would have a great bricklayer table that seem to be all the rage right now, but have the simple, clean lines to achieve staying power. 


This is what I actually bought.  It needs some work. it looks like they had something glued to the top that they ripped off.


The other side is very nice, so with a little work, it will be amazing. 


It is so great that you can stash things inside, I have not figured out what I am going to put inside yet. 


It has found a new home, with something on top, so I can hide the scar for awhile. The little lantern I painted recently, this is what it looked like before.


I saw it ten years ago and had to have it. It was never really my style, it is now though.