Wednesday, November 30, 2011

The Actual Wedding Reception Tables & Card Holder

You can see my previous post about my plans for our wedding reception tables. I had seen a Martha Stewart picture and knew that is what I wanted. I did not use as much ribbon as Martha did. I thought that I was going to be saving a lot of money this way. However, Ribbon is not inexpensive and in the 18 months we were planning the wedding not once did they go on sale. 


So I was that crazy lady, every week I would go to Joanns with my single 40% off coupon and get a single roll of ribbon. I ended up buying about 20 extra rolls the week of the wedding and then I just brought back the ribbon that was unopened afterwards. So I have a ton of ribbon and need ideas of what I should do with it. Seriously suggestions are so very welcome. 


These shots were mock up shots that I provided the Tea House. Although I was not able to have a wedding planner we were fortunate enough to have a  venue that set everything up to our specifications. So for both of our sanity I gave them very specific instructions. 


The favors were placed at each place setting all handmade by my mother in law Mary. I will post more about them later. 


This was the head table.


As the bridesmaids are modeling the table marker. I found five scrabble games at thrift stores to make the labels. They were all named after cities that we have gone to together. I have a project planned for after to utilize those tiles. 


Mason jars were kind of an after thought. One of the best surprises was how severely I under estimated the amount of flowers that we ordered. I mean severely... Like ran out of vases and pitchers and sinks so Christy and I were putting flowers in the bathtub. So we called Kristy and she went and got mason jars. I have seen tons of people use mason jars at weddings but never with the top on. We took the jar top off and kept the screw top on. I think they look more finished. The candles were from Khols I used the $10 coupons they sent me on them every time they had them in stock. I am now using them for decoration in our bedroom. 


Our wedding book and leaf your fingerprint tree. Thanks Nate!


This is also now in our bedroom. 


One set of my god parents leaving their prints on our wedding.


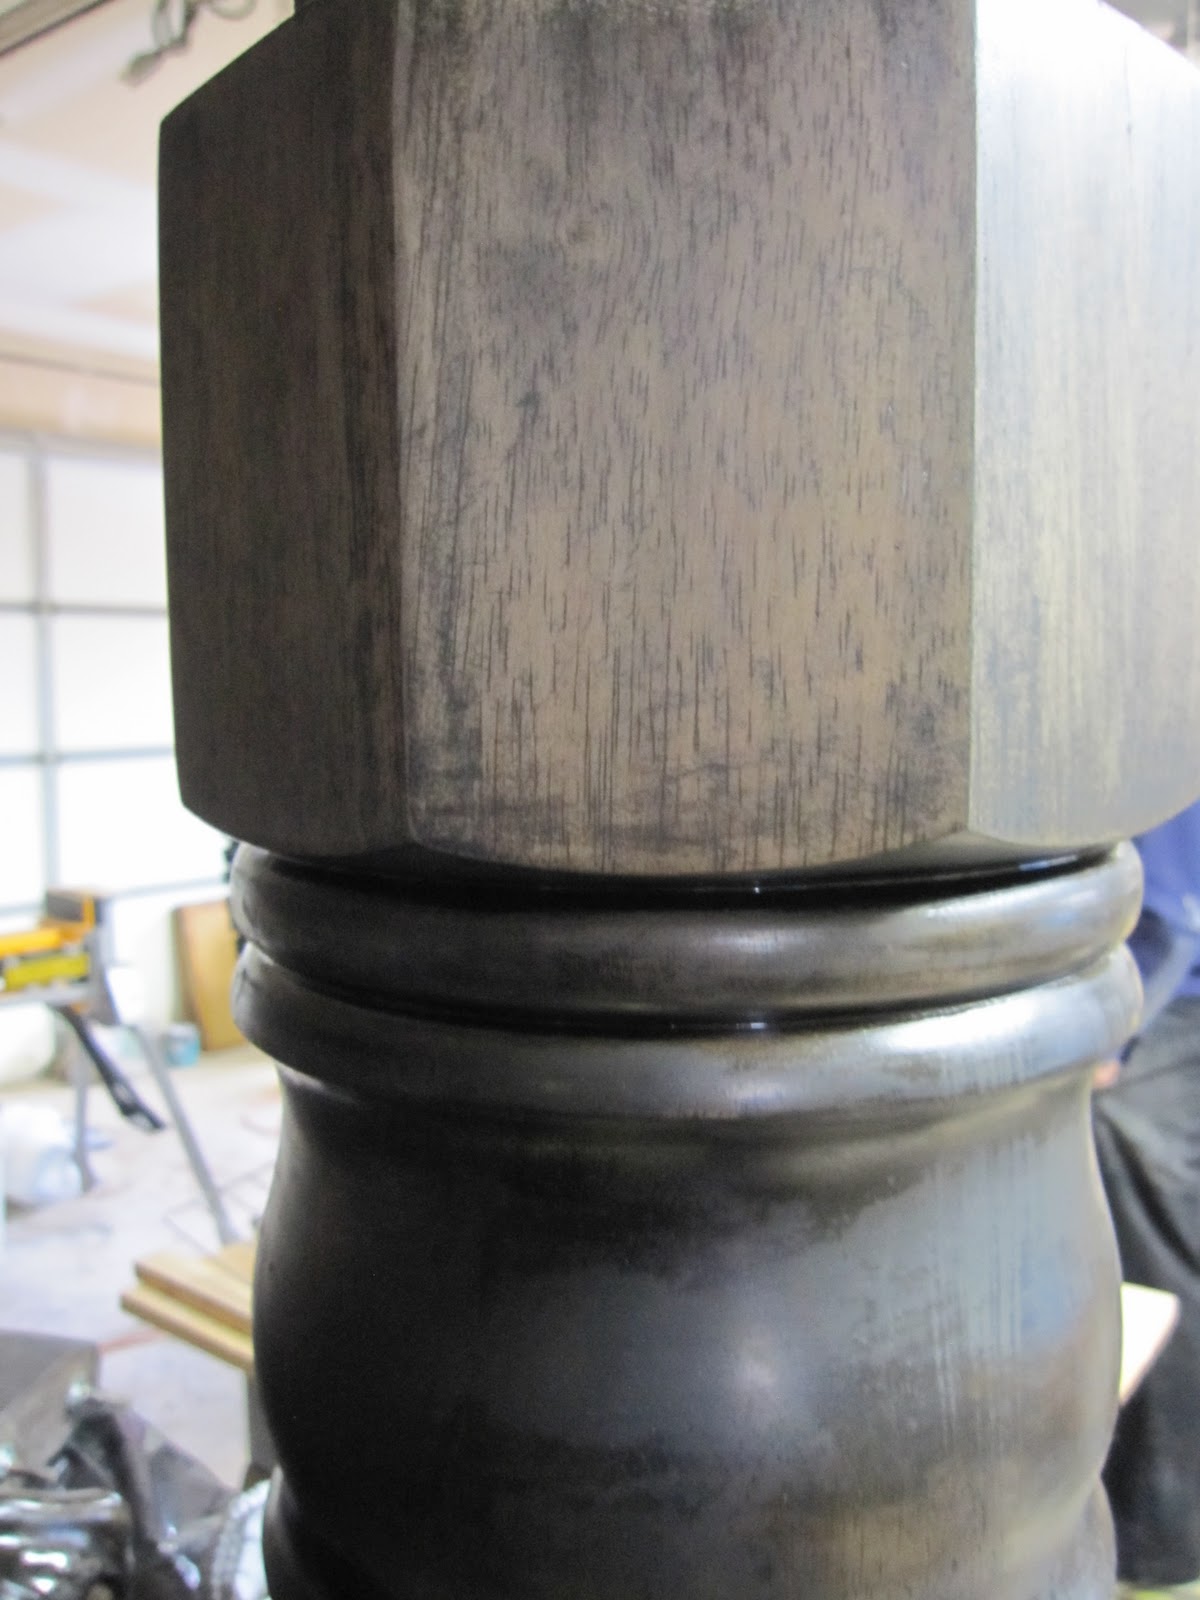
This was our card holder I posted about the idea of what we were going to do, and the progress report of how Leonard my fantastic father in law was doing in making it. 


You can see the the leaves that were meticulousness made by Melissa. Here is one of the projects we have made since then. There were hundreds so there will still be many more to come. 

Tuesday, November 29, 2011

Look What I Got Mikey For Christmas...

Just what he wanted!!!!


Thank you Williams-Sonoma! Check out the video on how great they are.

Steamed Buns with Roast Pork Filling


These are deeply deeply fabulous but there are four recipes you use to make them so it does require a pretty hefty commitment.  It is worth it, trust me. First make:


Asian Flavor Black Bean Sauce


  • 1 (15 ounces) can of black beans, undrained
  • 1 tablespoon soy sauce, we used an orange flavored one otherwise use low sodium
  • 1 1/2 teaspoon grated peeled ginger (We used a micro planner to avoid large chunks)
  • 1/2 teaspoon lemon rind
  • 1/2 teaspoon grated apple peel
  • 1/4 teaspoon crushed red pepper, more if you like it spicy which I do
  • 2 garlic cloves, grated
Combine all ingredients, bring to boil, stir, reduce to a simmer uncover for 20 minutes. Wait until cool unless you have a vita mix or a blender that will work with hot. Pulse until it is a course mash. 

Roast Pork Strips (Charsiu)
  • 2 pounds  boneless pork butt with fat
  • 4 tablespoons pork or chicken stock
  • 4 tablespoons thick sweet soy sauce (ABC) is great
  • 2 tablespoon of Asian Flavor Black Bean Sauce (see above)
  • 2 tablespoon Red Chinese Rice Wine or Pale Dry Sherry
  • 3 Tablespoons of Sugar
  • 1 1/2 Teaspoon of Sea Salt
  • 2 Teaspoon grated garlic
  • Some people put in Red Food Coloring for the Red Chinese Pork look but if it doesn't add to the flavor we leave it out
Cut pork in to 1 1/2 inch strips. Lay them in a lasagna dish. Preferably one layer but 2 layers will still work if your dish is smaller.

In a small bowl combine the rest of the ingredients. Mix vigorously. Pour over over pork. make sure they are all covered. Cover, and allow to marinate at room temperature for atleast 3 hours or in the fridge atleast 6 hours. Turn strips every hour or so.

Put a pan with raised edges with water about half full and place on the lowest rack of the oven. This will catch the drippings as they roast. Then you can either use S hooks to hand meat or string all pork up on metal wire on the highest rack of the oven. You want to do this in a cool oven or you will most likely burn yourself.

Heat oven to 350 once the oven is heated set timer for 45 minutes.


Increase oven heat to 450 and continue to roast for 15 minutes. or until pork is golden brown in color. 

Take pork out and cut cross wise in to thin strips.

This can be served by its self over rice, you can add sautated veggies like snap peas and green onions. 

Basic Yeast Dough
  • 3 Tablespoons of Sugar
  • 1 Cup Warm Water
  • 2 1/4 Teaspoon Dry Yeast (or 1 package)
  • 3 Cups Flour (start with 2 cups add more as needed)
  • 2 Tablespoons Canola Oil
  • 1 1/2 Teaspoons baking powder (add after the first rise)
Dissolve the sugar in the yeast, gently stirring. Set aside until foam forms about 10 minutes.

Sift the flour in to a bowl add oil mix with wood spoon, gradually add yeast mixture. Mix ingredients less baking powder in to a rough dough


Lightly flour your counter and kneed mixture for 8-10 minutes until smooth and elastic. Add additional flour if mixture is sticky.

Lightly oil a large bowl, and dough mixture set oiled dough in to oiled bowl and cover with a damp cloth. Set aside and rise in a warm area for 3 hours.

Uncover and punch the dough Flatten it out and make a well in the center add the baking powder, kneed until powder is incorporated.

Roll in to loaf. Cut in to biscuits


Steamed Buns with Roasted Pork Filling


  • Basic Yeast Dough
  • 2 Tablespoons of Peanut Oil
  • Roasted Pork Strips
  • 2 Teaspoons of Sugar
  • 4 Tablespoons Dark Thick Sweet Soy Sauce (ABC)
  • 4 Tablespoons Cornstarch, dissolved in
  • 6 Tablespoons Chicken Stock
  • Half of the remaining Black Beans Sauce


Set a wok over high heat for about 30 seconds, our in 1 tablespoon of peanut oil, move it around the pan. Turn the heat down if it starts to smoke. Add pork and stir fry for 1 minute. Then stir in soy sauce and sugar. Dissolve the cornstarch in the chicken stock, add to the pan. For another 10 seconds cook stirring constantly,  or until the the mixture thickens and the pork is covered with a clear glaze.


On a lightly floured surface take the dough biscuits a roll in to balls and flatten until they are 4 inches round. Place 2 tablespoons of filling in each round. Be very careful not to over fill. Pull up all the sides and push together to form a purse. Make sure it is completely sealed.  Place filled purses in the steamer container placing each purse on top of a 3 inch square wax paper and buns at least 1 inch apart. Cover with dry kitchen towel or if using bamboo steamer tray use the top. Let rise for 30 minutes.


Place steamer rack on top of boiling water, steam for 10 minutes serve hot. While that was going on we braised some beautiful baby bok choy.


Nom, nom, nom. :)


Linking to:

Friday, November 25, 2011

Drum roll please, presenting our new dinning room table

*This project was done about a year ago but I just realized that I never posted.

I was going to get my parent's dinning room table when they moved. I just needed the table, but then my brother needed a table and chairs and they all happened to match. And there was this other table. It had water damage on the top I sanded some and realized that it would sand out. It was the legs that really sold me.


These are the legs mid sand. 


I had been working on this little by little for months. I am not very good at staining and it makes me nervous so I was procrastinating a little a lot. So it sat in the garage. Waiting for enough coats of stain for it to match the entertainment center since it is open concept. When we went up to the Miller's for the weekend we brought it up and the boys worked on it, well they started over on it.


The way that I had been staining it had not been right so they sanded it off and started over... :(


Then it really started to look good. 


And now the finished product:


 I still love the detail under the table top


But the top...


That star burst design.


To see the process on the chairs...

Linking:


Thursday, November 24, 2011

Happy Thanksgiving

I hope you and yours had a wonderful Thanksgiving! I know we did.

I am thankful for my husband Mike. The family that we were able to see today, family we will see soon. For my friends that I feel so grateful for. That we have a roof over our heads and food a food in our bellies. A lot of food in our bellies today. That so many people were able to spend our special day with us this year. I am most thankful for all the good times to come.

Food we enjoyed today
 Turkey
turkey
 pomegranate lime cheesecake 
chocolate vanilla pie

The Never-Ending Curtain Battle Until Now ~ Tricky Thursdays

I have been having a battle with the curtains in the master bedroom pretty much since we moved in. When everyone came out to help in the days before I told my mom that this was one of the projects that I wanted to get done. Needless to say mom and Mikey vetoed that idea. I finished them last month and it was so easy. I posted about us originally putting them up and then pulling them down and putting them back up and them still being to high here. Well the solution ended up being $.74, a little paint and some time. I found these at the ARC:


I painted them black with the General Finishes Lamp Black Milk Paint that I used in this project. So I painted them right over the existing finish which sounds so dangerous but I have done it so many times with this milk paint and it works so well. I think that I painted three coats then I sewed them on to the curtains I was able to use seven per panel. 


Now they are the right length! Yay!


Wednesday, November 23, 2011

Escort Card Holder & Entry Table ~ Wedding Wednesday

I wanted the table on the way in to have more than just the guest table. Nat got us a finger print tree that he had custom made for us, it was an aspen grove instead. Mikey and I found this:


I asked Mary my mother in law if she could pick up some navy milk paint. It happened to be on clearance so she got it for $1.


I sanded it down so the paint would stick.


Then I painted.


Here it was all assembled at the reception.


Signing the guest book, and leafing your fingerprint. 


Afterwords I gave this to my friend Shantel she uses the escort card holder as a potty training chart. She keeps prizes in the cubbies. 

Tuesday, November 22, 2011

Quick bookshelf update and posts to do

Before everyone came out for the wedding there were a ton of projects I wanted to get done. This is super understandable seeing as so many people that I never get to see were going to be at our house and for a lot of them it would be the only time they would be there. There were some huge projects like decorating the guest bedroom, some ones that did not make it like finishing the family room drapes (which still needs to be done), lengthening the master bedroom drapes (which I will post about later this week), and little projects that did get done like this quick shelf update.


My parents gave us these shelves when we moved in to our condo. We happened to buy our condo about six months before they moved so we were granted with extras as they were purging when we were accumulating. These shelves are in no way special I think my step dad Greg got them at office max or something. Black is pretty predominant in our place and I wanted shelves when you first walked in so they were perfect in those facts coupled with they were free. Thanks mom and Greg!


The tops always bothered me they were gray speckled finish like cheap counter tops. I decided to just paint the top and oh what a difference it made. I used my favorite paint. General finishes milk paint in lamp black. This stuff will coat any type of surface is durable and the finish is flawless. They are not even a sponsor of mine. But I would LOVE them to be, if you happen to know anyone that works there, I will work for paint... and stain. :) 


Huge difference. To see my tutorial on the numbered baskets. Anyway that was kind of a short post and feels like cheating a bit so here is the blogging to do list I posted last month with updated links. I will continue to link them up as I finish. If there is something you would like to see, leave me a comment and I will work on that first. 

Upcoming projects
  • Master bathroom
  • Picture ledges
  • Sofa table - this is going to be cool! A no cost makeover that started with this: