Tuesday, November 30, 2010

I wish inspirational board pins

My mom gave these ornaments to me in 2008 when my color scheme was all about teal. As I realized the other night that is not going to work anymore. These however will work in the office guest room.


Supplies were pretty simple: the ornaments, gorilla glue and eight tacks 


I took the loopies off with a large toenail clipper.


Then I glued the tacks on at various places.


Christmas Ornaments from Vintage Typewriter Balls, Volume 2

Autumn in New York was a movie that I have always loved, I might watch it this week as I am feeling a bit nostalgic. 


After I made my Red Feather Typewriter Ball Christmas Ornament, I was feeling inspired and wanted to make another one that will go with the decor of our condo. In this movie Charlotte Fielding (played By Wynnona Rider) has this glass mobile sculpture that she keeps in her bedroom that reminds her of her mother she keeps adding to it as she sees things that would fit. I was unable to find any pictures of it but you can see what I am talking about in this video about a minute into it. 


I decided to use a lot of the stuff that I had left over from the little bling sprays that I made for the bouquets at the wedding that will be Christmas tree decorations afterwards (Post to come). I also added to the mix a few old necklaces that I cut to length, a broken jeweled belt that were so popular years ago and a round earring that I had lost the match to. If you could find 2 hoop earrings with dangles like this it would be ideal or even 4 so you would have that as a constant all the way around. This one will be a bit more A symmetrical. I clipped on the ends of earrings that I could and I put the o rings together to add stability. It is one heavy ornament.


Monday, November 29, 2010

What I want for Christmas

Medal Bendy straws from West Elm


This yellow submarine tea infuser that I had previously posted on here.  

These Quartz Crystal Ornaments that I posted about here:


Domino Decorating Book - How I do not have this already I do not know. 


Retired wine barrel lazy Susan Uncommongoods.com (I like the light one)


Bonsai forest Uncommongoods.com


That is all I can really think of how easy is that? Mikey and I already had our Christmas, we pretty much got it ironed out yesterday. Minus a few items that they had to order in, So this year new audio for our home theater. 


Merry Christmas!


Christmas Ornaments from Vintage Typewriter Balls, Volume 1

A few years ago I was fortunate enough, due to my amazing shopping skills I came across a box of eight vintage typewriter balls at the goodwill. I cannot seem to remember what I paid for them. This was one of those things that I saw and had to have but was never really sure what to do with. Then last night after the night of no sleep I decided to make some Christmas ornaments.


This first one will be a gift as it does not go with my color scheme but I had these red feathers and I just could not resist.

Materials:

  • Red feather boarder
  • Red silken cord
  • One Vintage Typewriter ball
  • Hot glue gun

First tie a double knot in the silken cord and pull through the hole in the top and hot glue in place. Then roll up the feathers you can do it one of 2 ways, inward which gives you a tapered almost rabbit foot like appearance or outward that looks more like a badminton ball.


I did glue as I tightly wrapped the feathers to make sure they would fit inside of the ball.


Then I used hot glue around the top of the ball, you want it to fit snugly and make sure that there is enough hot glue in the top to hold everything in place. 

Sunday, November 28, 2010

6+2=8

So today was kind of crazy I started the day at Williams-Sonoma (wasn't I just there yesterday, why yes, yes I was). Today however I went to a cookie exchange class so we will be better prepared to run the one this year. Then I went to a Goodwill, I did not find a single thing. When I went to the ARC however:


$7.99 each, Jackpot! I needed to find more chairs for the table with the leaves that will now seat 8. These are very unique, I have one other set of 2 and the rest are all oddballs.Check out the beautiful rose detail:


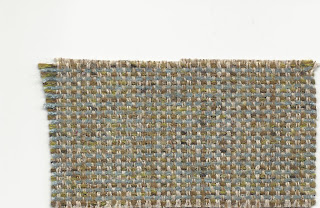
So these chairs will be joining the six chairs from my previous chair post. They will all get a makeover with cream paint and a tweed seat cover with this fabric, you have all seen the color scheme from the condo's main rooms the slate blue, charcoal, cream and chocolate. In the dinning room I wanted to have something a little extra so we added green.


Just another project in the works. 


Dinner tonight

So I had a dinner party tonight for eight people: my Grandma, her boyfriend John, my dad, Lisa, Chris, Sandy, Mikey and myself. I made this:


This meat loaf includes a delicious surprise: Cubes of mozzarella cheese are blended into the meat mixture, while shredded cheese is combined with bread crumbs and herbs to create a sublime topping. Your hands are the best tool for mixing the ground beef and other ingredients; be careful not to overmix, as the meat loaf can become too dense.

Ingredients:

  • 4 Tbs. extra-virgin olive oil
  • 2 carrots, cut into 1/4-inch dice
  • 2 celery stalks, cut into 1/4-inch dice
  • 1 onion, cut into 1/4-inch dice
  • 1/2 oz. dried wild mushrooms, soaked in 1 cup hot water,
      chopped, soaking liquid reserved
  • 3 garlic cloves, minced
  • 2 1/4 cups fresh bread crumbs
  • 1 Tbs. plus 1/4 cup minced fresh flat-leaf parsley
  • 2 oz. mozzarella cheese, shredded, plus 6 oz., cut into 1/2-inch cubes
  • Salt and freshly ground pepper, to taste
  • 2 lb. ground beef (80% lean)
  • 2 eggs, lightly beaten
  • 1/2 tsp. minced fresh thyme
  • Mashed potatoes for serving (see related recipe at left)

Directions:

Position a rack in the lower third of an oven and preheat to 350°F. Coat the bottom of a roasting pan with 1 Tbs. of the oil.

In a deep sauté pan over medium-high heat, warm 2 Tbs. of the olive oil. Add the carrots, celery and onion and sauté until tender and starting to caramelize, 8 to 10 minutes. Add the mushrooms and garlic and sauté for 1 minute. Let cool for 10 minutes.

In a bowl, combine 1 1/2 cups of the bread crumbs and 1/3 cup of the mushroom soaking liquid and soak for 5 minutes. In another bowl, combine the remaining 3/4 cup bread crumbs, the 1 Tbs. parsley, the remaining 1 Tbs. olive oil, shredded cheese, salt and pepper.

In a large bowl, using your hands, gently mix together the ground beef, soaked bread crumbs, vegetable mixture, eggs, the 1/4 cup parsley, thyme, cubed cheese, salt and pepper. Transfer the mixture to the prepared pan and shape into a 10-by-5-inch loaf. Cover the top and sides of the meat loaf with the cheese-bread crumb mixture.

Bake until an instant-read thermometer inserted into the center of the meat loaf registers 165°F, about 1 hour and 10 minutes. Let the meat loaf rest for 5 minutes before slicing. Serve with mashed potatoes. Serves 8.

Williams-Sonoma Kitchen
I know that a lot of people don't like meatloaf, this might convert you... We also made rosemary red potatoes and homemade garlic bread. Dad and Lisa and Chris and Sandy brought up two bottles of wine (yay! and that means two more corks for this project), and a pecan pie. Dinner was scrumptious and the company was delightful. 


Saturday, November 27, 2010

It is starting to feel a lot like Christmas

Every year as a child my mom would bring me to go see the nutcracker, nothing gets me in the mood more than that. I love the ballet, and my brother loved the nutcrackers, as a child I collected porcelain dolls and my brother collected nutcrackers. We used them to decorate our childhood home for Christmas, he had somewhere over a hundred. Tonight Mikey and I are going with a bunch of friends as my mom recently moved to Texas. Then tomorrow I will be decorating for Christmas.


1000+


yay!

Green Cleaning

Today's post is all about cleaning, as that is what I am going to be be doing today. This last year I have taken a lot of steps to become more green outside of the regular recycling and not using disposable shopping bags. Other ways that I have changed is in the way I clean. I used to be a clorox-wipe-aholic, I would buy them in bulk (as I still have several containers around as a result of this bulk buying) but when you clean with clorox wipes you easily can be throwing away 15 of them every time you clean your kitchen and bathrooms, if it was a big mess in the kitchen it can be much more. Also bleach is a pretty harsh chemical, while it can definitely be necessary in some situations that is not always the norm. I have also adopted a one in one out policy when it comes to clothing. For every piece I bring in I have to donate or get rid of another. I donate things that I think other people would enjoy, if it is a tee shirt I got at a conference I cut it up to make cleaning rags with that I generally wash or if the job is really bad, like spilled paint on occasion I  will throw one away. I still have access to bleach, but most of the time I will just use good old soap and water.

The deep cleans like I am going to be doing today is quite a different story. My goal is that as I save some of my current cleaning products for big messes or quick clean ups that the only thing that I will need in the future is AJAX as I need my bathtub, shower, grout, and sink to be really clean. The rest can be handed primarily with the Shark steam products that I have purchased this year. I am all about sanitization, but if you can do it without harmful chemicals that is the way to go. All that the shark cleaning line needs is water. There is no waste, it is dry almost instantly. Which is great if you have kids, or pets, or if you spill something all over your floor right before a dinner party. Then when you are done you just throw the pads in to the washer, this is the only catch that I do not like, they have to be by themselves, no towels or anything else can go with them.

I like to clean from the top down so if anything comes off the counter I will clean it when I get the floors, I have the handheld model SC630D. It runs around a hundred dollars, there is another on that is about twenty dollars less, getting the same one I did might be the best twenty dollars you ever spent.

The less expensive one


The more expensive one


I know that the carrying bag does not make the difference, but it is nice. The two extras that will rock your world are the two extra wedge attachments, the yellow one does mirrors and windows in a way that will rock your world, even when you have those mirrored electrical outlets on the mirror an the gray one is a oven cleaner. If you have not replaced your oven for a Samsung that had steam clean in the oven, this is the next best thing and at a tenth or twelfth of the cost. 

For my gout I have an extra head for my sonicare toothbrush that is clearly marked cleaning only. You know what they can do for your teeth, now you know what they can do for your grout. 

When we purchased our place this year we put in hardwood floors all over the condo, all of the kitchen and the bathrooms already had that nice linoleum that looks like tile. So my first purchase was a shark steam mop. I already have a Dyson which are green to because there are no filters to replace and they have a 5 year warranty so you are sure that it won't be in a landfill anytime soon. I have the DC 17 Animal


I have had it for a few years, I got this one right after Mikey got back from Iraq, I got it the same day Mikey got a new WRX, I was more excited than he was. This was actually my third Dyson, not because I have ever had one break, but the ones that I have previously bought I have lost during a break-up. I always get the animal. For those of you that do not know about Dyson any Dyson in the same line i.e. DC17 they are the same vacuum they just have a different color cap that tells you what type of accessories it comes with. The animal always comes with the most. For example

The Flat Out Head - I use this one the most, instead of a broom I use this to vacuum up all the dry stuff before I use the shark. 


Mini Turbine Head - Great for sofas.


Car Kit Vacuum - Great for the car


The flexible crevice tool is great, not just for under the seats in the car but down the lint trap in the dryer and my personal favorite baseboards, the get hair and dust on top of them especially when you have dogs, this will  suction on and then you just walk down the hallway and it just cleans everything off. 

Just in case you are not convinced of the amazing power of a Dyson I will tell you a story of the first story Dyson that I ever had. The house we had lived in at the time had been lived in for a year already and before that the people who lived there had a black dog, we had a little white dog. I had vacuumed that house three to four times a week with a Kirby. When I first got the dyson not only did it pick up at least a full canister in every room you would have thought we had a dalmatian, gross. After that I will never have another vacuum.

Anyway so after I vacuum everything then I will shark it. I have the shark SC3501, the model number is important because it is the one that has the double sided mop that you can just flip it over when one side gets dirty.


 It also has the corner pads that work great in the bathroom, and purple nubby heads.


You can get one at Best Buy for around a hundred dollars. This has a really long cord, if I plug in in the dinning room I can get the whole condo without replugging. As you steam you can immediately walk over somewhere you have just steamed it will be warm but not wet.  

Friday, November 26, 2010

A penny for your thoughts part 2

So I had a lot of time to surf the internet today and I came across this at Apartment Therapy:

10 Reasons to Have a Change Jar
111011ChangeJar.jpg
It's easy to think of coins as a jingly hassle in your pants pocket or bottom of your handbag. Paper money and bank account balances seem easier to consider real money. Loose change can add up, though, as you'll discover if you keep a change jar.
1. My husband and I keep a Mason jar in the closet into which we drop our change at the end of the day. Then, over Thanksgiving weekend we cash in our change at the bank, split the funds down the middle, then use our halves to buy each otherChristmas gifts. This has been a great way to set a strict budget for ourselves. Neither of us can go a little overboard on presents (because one or both of us always would) and we end up being far more creative in our gift giving.
2. In the past we used to keep a change jar as vacation savings. A few years ago when we were going to Las Vegas for a friend's wedding, we saved all of our change over a period of time then cashed it in and took it along as our gambling funds.
3. Earn some good karma by donating the contents of your change jar to a charity. The bell ringers will be out again this holiday season and they'd be delightfully surprised to see you dump a jar full of change into their bucket!
4. A full change jar can means hours of entertainment (and the potential of doubling your savings!) when you get your friends together for a game of poker. Word of warning: you may also end up with an empty jar if you don't play your cards right!
5. Pull out all the quarters and put them in a decorative container as an instant giftfor someone who uses coin laundry machines or to the friend who parks at a meter to come visit you.
6. Turn your change jar into a party! Set a goal of filling a container and, with the proceeds, have a party. Use a vase or other decorative container in your kitchen and as your friends visit tell them about your party plan. As they chip in, make a mental note to invite them to your party too.
7. Set a how-much-change-can-I-save challenge. A fun (and distracting!) game for families — set aside a jar for money you find on the streets and see how much you collect. Or keep separate jars and see who can collect and save the most change.
8. Use your collected coins as a happy birthday fund. You may be surprised how much money you can collect in a year. Use the money to treat yourself like a king or queen on the anniversary of your birth.
9. As you've probably heard, we're living through a recession right now. Drop of a few dollar bills along with your change into a jar and use it as a rainy day fund. If it's already raining, consider it your OH-MY-GOD-IT'S-A-HURRICANE! fund.
10. Use your collected coins to make one of the wonderful craft projects we've seen here. How about a penny desk or a nickel floor? You could also use coins in any mosaic project. Imagine the 50 States quarters as a mosaic candle holder.

It was number 10 that caught my eye I followed the link on the penny desk and found these:


I loved the rolled edge but I do not know how to do it. A blow torch is how you get rid of the bubbles, see the details here.

I like the octagonal edge too, but it does not really match the base that I am designing. It might be worth it to switch it up a bit if it was octagonal and pushed into the corner there would be a little triangle for the cords to go through. 

So here are my thoughts, when my parents moved my step-dad, Greg gave me the top to his old drafting table. I think that I just might cover it in pennies. I don't know if I want to collect them so they are dirty or if I want to go to the mint and see if I can get them there, shiny and new. I measured it out tonight and it would take 3760 of them, maybe less if I used the squished pennies that I have gotten through my travels. I would have a lip put on it so that we could pour in resin for a flat surface for all my crafts and a finished edge. Since I have seen the how to on the EPBOT page I am even more inspired. Well off to dinner for me, Mikey made Leonard's world famous chicken.


YUM!

Save to repair, what to do with all of the extra stuff

A lot of people are probably out shopping this morning. I had not shopped for clothes for a while before this last week. I now have a few very cute sweaters and a sparkle tank top. (I never got in to The Hills but it turns out that I do like Lauren Conrad's clothes) I like to make sure that if something happens to the clothes that I can repair it, at the same time I hate having extra buttons on the inside of the shirt because it is harder to iron them correctly. I am against anything that makes ironing harder as I do not like it that much to begin with.


You will need a few basic supplies to complete this project. Labels, mine are white of the generic shipping type labels, little ziplock bags there will be very small parts like beads you will need to keep in, and I like to see what is inside as opposed to small envelopes that are opaque, a pen because I am so neurotic I keep the same one with the supplies so that all of the labels will be the same, and a seam ripper for all of those shirts that have the extra buttons on the inside.  


Gather all of your extras.


If you have the tag from the store they can be very helpful, a lot of times they describe the item so that it can be distinguished from a lot of very similar items at the store. If not describe it yourself. I use the brand what type of clothing it is, the color and any other applicable adjectives. Write out the description on the label and decide how you want them to be laid out. 


I faced the ziplock part of the bag to the right and then placed the label in the upper left hand side, this is what you get when you are done. Then the only thing left is where to store them. I have a whole box for repair or upkeep of items where I keep shoe polish and such. Of course if you do not have something like that you could put them in your sock drawer or with your sewing supplies. 

Thursday, November 25, 2010

Happy Thanksgiving

Our thanksgiving started on Wednesday I had the day off and I decided to to make the pie crust from scratch. I have never done it before. About five years ago my ex-boyfriend bought me a marble rolling pin to get over this fear. 

It never helped. I though that I would eventually get over it but I never had. I had gotten an instant pie crust from Williams-Sonoma. Then after some light joking from Mikey I decided to just do it and see what happened. I had no idea what it took, five hours. I used this recipe, so you make the dough, then you have to put in the fridge for two hours, then you roll it out and put it in the freezer for thirty minutes. When you take it out you put parchment paper over it and fill it with pie weights and put it in the oven for a half an hour. Then you take them out and keep baking it for another half an hour and then take it out and let it cool completely. While it is cooling you make the pie filling. Then you fill the crust, and bake. It took so much longer than I expected. So we left really late, and got to Mikey's parents house late. When we got there Mary brought out a wonderful chocolate cake to celebrate her birthday from the Marigold Bakery in Colorado Springs, if you live near there you should go.


On Thursday morning we had German pancakes, with lemon juice, fresh whipped cream, and fresh raspberries.


We wrapped presents for their friends in Japan


So that they could get there in time. 


There were deers just hanging out in the yard, do you see the buck in the back left?


The doe was not even afraid of us. 


We were like five feet away from her here.


Then there was a Thanksgiving surprise (we had actually found out the night before) Leonard was making leaves for the table, (YAY) two of them, ten inches each.  


He found oak to match, and made the ends match, he routed them and Mikey is going to help him finish them the same. 


I know I went a little crazy with pictures and these are not even all of them,


But I was excited. Mary felt bad that we had two Thanksgivings in one day so we had Beef Bourguignon. 


Garlic Bread.


Beef Bourguignon via the foodnetwork.com

Ina Garten
Rated: 5 stars out of 5Rate itRead users' reviews (313)

  • Cook Time:

    1 hr 15 min
  • Level:

    Intermediate
  • Yield:

    6 servings

Ingredients

  • 1 tablespoon good olive oil
  • 8 ounces dry cured center cut applewood smoked bacon, diced
  • 2 1/2 pounds chuck beef cut into 1-inch cubes
  • Kosher salt
  • Freshly ground black pepper
  • 1 pound carrots, sliced diagonally into 1-inch chunks
  • 2 yellow onions, sliced
  • 2 teaspoons chopped garlic (2 cloves)
  • 1/2 cup Cognac
  • 1 (750 ml.) bottle good dry red wine such as Cote du Rhone orPinot Noir
  • 1 can (2 cups) beef broth
  • 1 tablespoon tomato paste
  • 1 teaspoon fresh thyme leaves (1/2 teaspoon dried)
  • 4 tablespoons unsalted butter at room temperature, divided
  • 3 tablespoons all-purpose flour
  • 1 pound frozen whole onions
  • 1 pound fresh mushrooms stems discarded, caps thickly sliced

For serving:

  • Country bread or Sour Dough, toasted or grilled and rubbed with garlic clove
  • 1/2 cup chopped fresh parsley, optional

Directions

Preheat the oven to 250 degrees F.
Heat the olive oil in a large Dutch oven. Add the bacon and cook over medium heat for 10 minutes, stirring occasionally, until the bacon is lightly browned. Remove the bacon with a slotted spoon to a large plate.
Dry the beef cubes with paper towels and then sprinkle them with salt and pepper. In batches in single layers, sear the beef in the hot oil for 3 to 5 minutes, turning to brown on all sides. Remove the seared cubes to the plate with the bacon and continue searing until all the beef is browned. Set aside.
Toss the carrots, and onions, 1 tablespoon of salt and 2 teaspoons of pepper in the fat in the pan and cook for 10 to 15 minutes, stirring occasionally, until the onions are lightly browned. Add the garlic and cook for 1 more minute. Add the Cognac, stand back, and ignite with a match to burn off the alcohol. Put the meat and bacon back into the pot with the juices. Add the bottle of wine plus enough beef broth to almost cover the meat. Add the tomato paste and thyme. Bring to a simmer, cover the pot with a tight-fitting lid and place it in the oven for about 1 1/4 hours or until the meat and vegetables are very tender when pierced with a fork.
Combine 2 tablespoons of butter and the flour with a fork and stir into the stew. Add the frozen onions. Saute the mushrooms in 2 tablespoons of butter for 10 minutes until lightly browned and then add to the stew. Bring the stew to a boil on top of the stove, then lower the heat and simmer for 15 minutes. Season to taste.
To serve, toast the bread in the toaster or oven. Rub each slice on 1 side with a cut clove of garlic. For each serving, spoon the stew over a slice of bread and sprinkle with parsley


Mash Potatoes.


All toasted up. 


Delicious all together.


This is one of the pies I made, decorated with leaf cutouts. 

Then we went to my dads house, we had a traditional Thanksgiving, I brought a pie there too. No pictures of the food though.